For decades, backdrops and green screens have been commonly used by photographers, videographers, and filmmakers to create specific environments or studio sets. But in today’s culture, many others outside these industries also utilize fabric backdrops and green screens for content creation, remote work, and more. Backdrops and greenscreens provide flexibility and creative control, allowing anyone to enhance their space and create captivating visual experiences.
While backdrops and green screens are easy to use and accessible for most, hanging them properly can be the main challenge in using them correctly. If you want to hang your backdrop to create a presentation that looks as professional and as put together as you are, we’re sharing all the tips and resources you need to do just that.
Working With A Green Screen

Green screens are called green for a reason; Whether you’re using a painted wall or hanging green fabric, optimizing your end product with the proper green screen color is essential. Here are some common terms to get familiar with regarding green screens.
Green Screen:
In technical terms, a green screen refers to the solid background you aim to eliminate from your shot in post-production and make it transparent. Typically, this backdrop is a single color chosen for its ability to contrast with human skin tones, with bright green being the most used. (In the early days of film, blue screens were also utilized and may still have specific applications today.)
Chroma Key:
This popular term goes hand-in-hand with green screen. It’s the actual technique of layering or compositing two images based on color hues. Every color has a chroma range, hence the genesis of the term.
Keying:
Keying is the process of removing the green screen background during post-production using video editing software. Once the green screen background is keyed, it becomes entirely transparent, allowing you to replace it with a different image or video. The objective is to achieve a seamless key without any digital artifacts remaining where the green screen was initially present, ensuring a clean and professional result in your final image or video footage.
Reflection Spill:
In the context of green screens, reflection refers to the colored light that bounces back onto the subject from the green screen. When the green screen is illuminated brightly, the light can reflect the green color onto the subject, resulting in unwanted green light spillage. This spillage can pose challenges during the keying stage of the process.
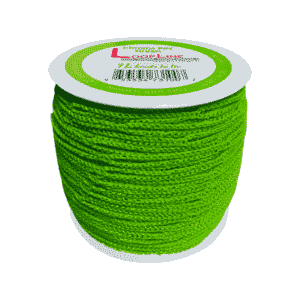
LoopLine in Chroma Key Green for use in video and photography studios. 328 ft. Spool
Using the Right Hardware
Now that your screen is ready for use, equipping yourself with the proper hardware to hang it is essential. You can’t just use any old hardware from the store and expect it to blend in – you need hardware that’s made for this task.
When Chroma Key Green LoopLine™ is used in tandem with a green screen, it becomes part of the background giving the suspended item the appearance of levitating. LoopLine connects easily and securely to boom arms, ceiling clips, or wire grids commonly used to strategically position objects in the shot. You can learn more about LoopLine products in our how-to guide here.
LoopLine replaces hard-to-work-with steel cable, metal chain, and monofilament to hang objects in front of a green screen. Easy to install, reusable, time-saving, and cost-efficient green screen hardware is what you want to find. Here are some additional products to explore.
Determine the size of your area
How big you make the cover of the cyc will affect how evenly and smoothly the light will fall on it. “Cyc” refers to a cyclorama or cyc wall. A cyc wall is a curved or seamless background used in photography, videography, and filmmaking. It is typically constructed with a smooth, continuous curve where the floor meets the wall, eliminating any visible corners or edges. Essentially, the bigger the curve, the easier it is to light.
If you do smaller-scale work, you might consider buying a tabletop cyclorama or hanging seamless white paper or a fabric green screen from C-stands. It all depends on your space and frame of the photo or video.
Getting the Right Length Of Line
If you’re wondering how to measure ceiling height in your facility and are unsure where to start, we’re here to help you. Check out our 4 easy steps that outline how to accurately measure your ceiling height and understand where you need to hang your backdrop.
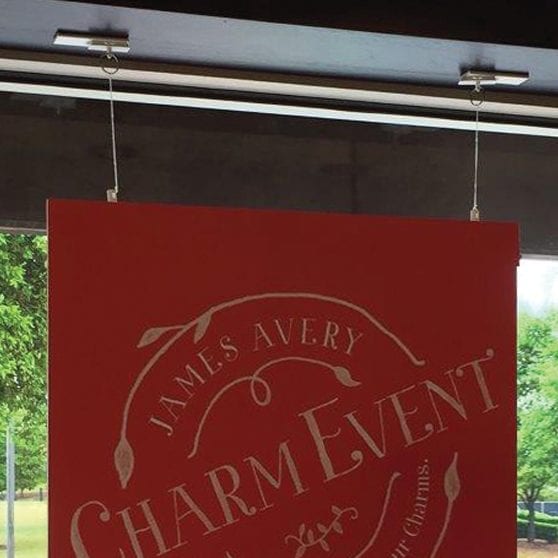
Once you know where to hang things, it’s time to start setting it all up. For those using green screen Chroma Key (which we highly recommend!), you can learn more about getting the perfect length from Ceiling Outfitters. Chroma Key LoopLine has 25 lb. tensile strength and is offered in two spool sizes, 82 ft., and 328 ft. LoopLine makes hanging signs, ceiling displays and objects quick and easy. When each line has the same number of loops, your item will hang level. Count out the same number of loops for each line and cut with scissors or a knife to the desired length.
Hanging Your Backdrop or Green Screen
You are almost ready to hang the green screen. The final bit of hardware you need depends on whether you are hanging the green screen from the ceiling, a C-Stand with a boom or other device.
If you have access to a ceiling with a steel surface like the T-bar of a drop ceiling or a steel girder, consider the strong, permanent ClikMagnet™. For a lightweight green screen attaching to a drop ceiling T-bar, you can also choose the E-Z Twist-On Ceiling Hook. Be sure and use a series of these as each Ceiling Hook can only hold about 3 lbs. Or, select the E-Z Twist-On Metal Ceiling Clip. This clip holds up to 30 lbs.
If you are using a C-Stand with a boom arm, simply open the loops and slide them onto the arm. Use some gaffers tape to fix the line in place.
Here are the steps for using LoopLine:
- Cut your Chroma Key Green LoopLine to the desired length with scissors. Ensure each line has the same number of loops so the sign hangs level.
- Insert one end of LoopLine through the opening on the ceiling clip or ClikMagnet™ ring. Feed the opposite end of the line completely through the first loop and pull tight to finish the connection.
- Insert the opposite end of the line through the sign hole or banner hanger clip. Feed the attached ceiling clip or ClikMagnet completely through the first loop and pull tight.
- Reverse the steps to remove LoopLine for repeated use.
Additional Tips For Hanging Backdrops and Green Screens
We know your first time hanging a backdrop or green screen may be a challenge, so here are some additional tips to help you execute it with ease.
- Design the base of a backdrop before attempting to secure anything to it. For example, you might staple boxwood panels to it or paint it.
- If you plan on folding a backdrop to store and reuse it, use something temporary to attach the signs, like LoopLine.
- If the green background is not solid, then the chroma key software will have difficulty distinguishing the darker greens from the lighter ones.
- When lighting your green screen, ensure there is even, soft light on the entirety of the green screen, and be sure to use whatever lights you have to expose the green screen background evenly.
Let’s get to hanging!
With the right products, preparation, and processes in place, hanging your backdrop or green screen should be a breeze. But if you still have questions or are looking for additional products to help you hang, you can reach out to our team and explore our catalog of products made with you in mind today.
Happy hanging!